Now that you have made up your mind on buying a DSLR and have hopefully allocated a budget, let me present you with what I think are your best options to spend your money based on my experiences over the last 3 years. I have kept the recommendations as platform agnostic as possible and tried to present options that will give you the most value in the long term. To start off, you’ll need to DSLR body and a lens to go with it. You can then add on other lenses and accessories over the course of your photography journey. You also need to choose the company whose platform you want to buy into as this will determine not just your initial options, but also your upgrade roadmap.
It makes sense to split your budget into two in order to choose the lens and body. A 50:50 or 60:40 split (lens:body) should give a good balance. The table below is based on Indian market prices, so if you decide to get the equipment from abroad, you should be able to get them 15-20% cheaper at the very least.

Body
Choosing the right DSLR body is an important first step, and the cost can range from around Rs 20,000 to a few lakhs. We are already in a situation where even the starter bodies give excellent results. However, investing in a higher end model gives you more room for growth as you get accustomed to the DSLR system. Typically, the starter models have the least capable sensor (about sensor formats), while the mid-range to pro\semi-pro models have similar ones. While megapixels should not be a driving force in Point & Shoot or Smartphone camera buying decisions, they still have some value in the DSLR arena. The images you obtain using a DSLR are of a much higher quality and more megapixels give you more cropping room.
Higher end bodies also have better construction quality with the pro models being weather sealed when paired with a suitable lens. Of course, this also means that higher end models are heavier. Apart from this, higher end models have a lot more controls in the form of buttons and dials. This makes it easier to access a lot of the advanced functions that a DSLR offers, but you will appreciate this only later on. In fact, buying a higher end body can seem intimidating if you are not used to tinkering with camera controls. The camera manual is something you should be prepared to read if you want to make the most of your new purchase.
Auto focus performance is an area where a higher end body will have a big leg up on the lower end models. This can make a tangible difference in the images you capture, particularly for moving subjects. Of course, the lens also plays a major role in this area.
A few other features to consider are touch screen capabilities, tilt & swivel screens and wireless flash control capability. While the first two features can make your life easier while using the camera and composing images, the third option is something that you will need a capable external flash to appreciate. An external flash is one of my recommended accessories, and this feature will help you use it even better (explore the Strobist blog on this topic, though you will appreciate it a lot more down the line). This feature is available on most of the mid-range bodies and higher up. Some OEMs (Sony, Olympus, Pentax) also offer image stabilization built into the camera body and this can make for cheaper lenses while making the feature available at all times.
My recommendation is to invest in a mid-range body (unless you can get a relatively recent pro\semi-pro model second hand) as they offer a good set of controls. Also, it is better to buy the model from a year or two earlier as the price will be a lot more reasonable, while offering similar image quality and features to the current year’s model. Starter models, while cheap will begin to feel limited in a couple of years once you get used to the system.
Lens options
First thing you need to do is to make yourself familiar with the terms like aperture and focal length as these are the basic parameters based on which you will be choosing lenses. Secondly, you need to understand that lenses do not come down in price unlike the DSLR bodies. So, it is better to either buy the lens that you want right now or save up for it rather than buying a lower quality lens and upgrading later. Thirdly, lenses are made not just by the companies that manufacture DSLR bodies, but also by other companies like Tamron, Sigma and Tokina for these DSLR platforms. Their lenses are usually cheaper than the OEM versions and can be a good deal on a limited budget.
The lens choice might seem pretty simple to begin with as most DSLR bodies come bundled with a lens or two (usually called kit lens). However, lenses can make the biggest difference in the type and quality of images you can take and it is typically better to skip the kit lens keeping the photography journey in mind. You could go for the kit lens in a few scenarios:
- Constrained budget (option 1 of the table) – the kit lenses still give you really good images, way better than any Point & Shoot can offer. Plus you get 2 lenses covering a long focal length range (the lenses by themselves would cost over Rs 20,000).
- 6 figure budget in which case the bundled lenses are actually premium ones
- You will be shooting a lot of videos in which case going for the silent and smooth focusing kit lenses (Canon uses the STM moniker) makes sense
Other parameters to consider when choosing a lens (apart from focal length and aperture) are availability of image stabilization and the kind of focus motor being used. The former can help when shooting handheld while the latter can make for faster and silent focusing. If you plan to use circular polarizing filters with the lens, it also helps if the front element of the lens does not rotate when focussing or zooming.
My recommendation for a starting lens is to go for a general purpose zoom as this will let you shoot images in different scenarios. A lot of people suggest to start with a prime lens (fixed focal length, i.e., no zoom). While it does help you become a better photographer, a prime lens will make it difficult a lot of images as there will be situations where you won’t be able to move close enough or far enough to compose your shot. However, a prime lens makes for an excellent second lens and my recommendation is to get one of the 50mm versions eventually, unless you have gone for a wide aperture (f/2.8) zoom lens.
Even in general purpose zooms, you have quite a few options – starting from third party zooms like 17-50mm f/2.8 costing around Rs 20-25K to premium first party models like the 24-70mm f/2.8 costing around a lakh. Here’s a brief explanation of my recommendations from the initial table:
- Kit lenses (normal zoom + telephoto zoom) – typically the 18-55mm f/3.5-5.6 & 55-200mm or 55-250mm f/4-5.6. These offer good value for money, but not the best possible image quality or convenience (particularly CPL filters).
- Wide aperture zoom – typically the 17-50mm or 17-55mm f/2.8 lenses available from both OEMs and third parties. Both image stabilized and non-stabilized versions are available. While they may seem to be similar to the kit lens in terms of focal length, the image quality is considerably better due to the better quality elements used (check out the comparison image in the middle of this review). The other tangible benefit is the constant wide aperture of f/2.8 that results in a 2 stop advantage at the long end. Not only does it help in low light shooting (lower ISO or faster shutter), but it can also help you blur the background when taking portraits. You will also appreciate the constant aperture across the focal length range when shooting in manual mode as you don’t need to adjust the settings when shooting wide open.
- Ultrazoom – typically the 18-200mm to 18-300mm variable aperture, again available from both OEMs and third parties. These may not offer very good image quality (on par with the kit lens), but make up for it with their focal length range. You are basically paying for the convenience of not having to carry around and change between two lenses. If you are not sure of what situations you will be using your camera or plan to travel quite a bit, this makes for a good choice.
- High quality zooms – these are usually premium lenses made of high quality components giving you shaper and more colourful images. Most of these lenses have constant apertures and offer fast and silent focusing. Which lens you choose will be governed by your budget and focal length requirements.
Accessories
This is an area where you may not choose to invest immediately, but over time you can add on some basic equipment like a flash and filters for some interesting effects. At times in low light, you will find that even a DSLR does not give you the kind of images you had hoped for and the on camera flash makes things even worse. That will be the time to create your own get an external flash with a tilt and swivel head. Tripods are another frequently recommended equipment, but thus far I have not felt much need for it as I prefer handheld photography and image stabilization takes care of my needs. If you do want to go for a tripod, don’t bother with the cheaper models as they will not be very stable and I doubt you want your investment on the camera to come crashing to the ground. Instead, do some shooting and figure out whether you actually need one, and then be prepared to invest Rs 10-15K on a decent model.
You will also need to good camera bag to carry around your equipment and you are likely to get a decent one bundled with your initial purchase. That should take care of your needs till you decide to buy more lenses and\or a flash.
Which system to choose
My recommendation would be to choose either Canon or Nikon (especially if you are in India) due to their market presence and lens range, while Sony is a distant third option. Olympus also has its DSLRs, but they use a smaller sensor and their network and lens range is limited. Pentax is pretty popular in the USA, but their presence is practically non-existent in India. There are also the mirror-less models from Sony, Canon, Nikon and Panasonic but the lens options are again quite limited and they don’t really give you much advantage over a full-fledged DSLR in terms of size or weight.
Another aspect to factor in is which system your friends and relatives are using and choosing accordingly. This will enable you to borrow and exchange equipment, particularly lenses and open up more avenues for experimentation.
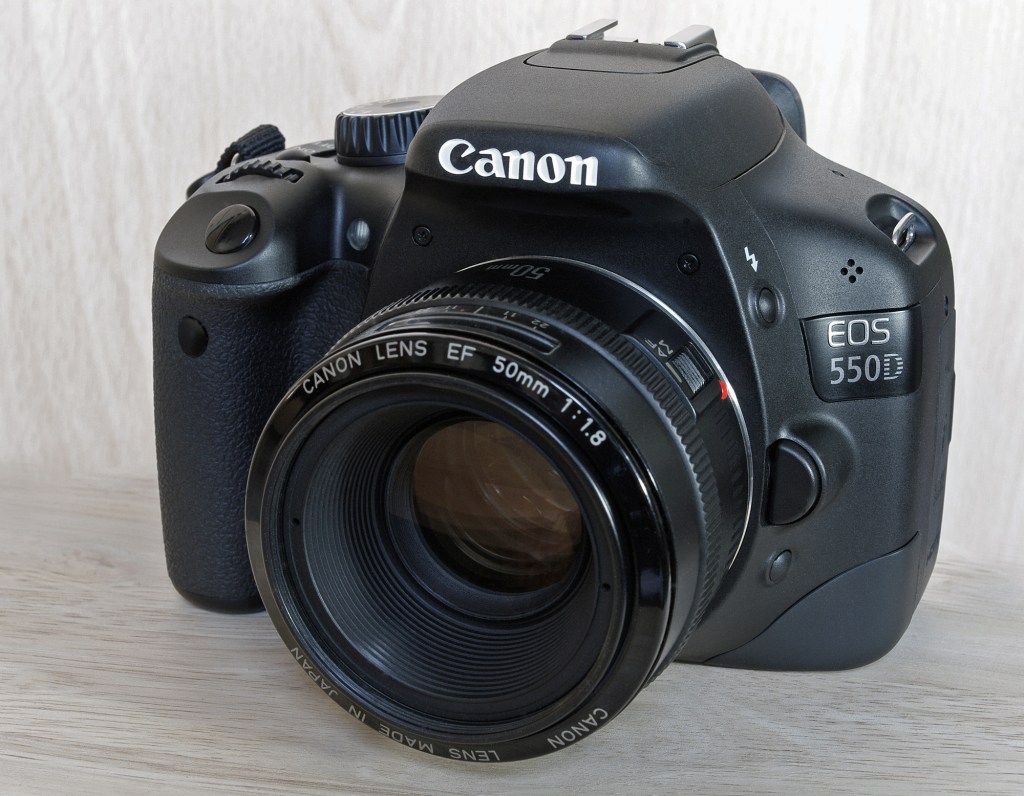
Personally, I am a Canon user (EOS 550D), and my decision was based on having used the Canon system of Point & Shoot cameras starting with the PowerShot A300 and moving up to the A630. Plus, the 550D was the best mid-range model in 2010 (Nikon had the D5000 then).
What you get for your money
Today, when you buy a DSLR, you are entering not just the world of still photography, but also that of videography. It will also be your first step towards building your photography platform of choice. If you are coming from a Point & Shoot or camera-phone background, then you will really appreciate the better quality images to begin with. Over the course of your journey, you will also experience the images that were not technically possible on your previous cameras due to their limited low light capabilities and slow focus. Just remember to carry your new DSLR on your expeditions.
The road ahead
I hope that I have given some basic guidelines that will make it easier to choose which DSLR to buy. You can always read up more on the web and check out the current market prices of the bodies and lenses. So, do some more research, make up your mind on what to get, and go get that DSLR.
It will be pretty tempting to spend more money on equipment once you have got the camera. However, the main area where you should be investing after getting your camera is in improving your skill (shoot as much as you can) and buying a few photography books should be a worthwhile investment.
If you want some ideas from me on what you should do with that DSLR of yours, stay tuned for my next post in this series.